
Searching:
0 results found Back
BackCreating an Application – Portal Workflow

Note ‒ You may refer to Application Developer Workflow for a description of the workflow for an application developer.
Step 1, Logging In
Contact Axonize to set up an account for you. We will send you the URL of the Axonize Portal and the user name and password for logging in.
Step 2, Adding a Product
A Product is a type of Device, and serves as a way of grouping Devices. See Products for a description of what a Product is.
In the Axonize Portal, click the ![]() button. The following window displays:
button. The following window displays:
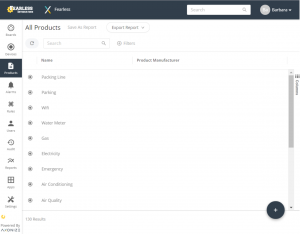
See Creating a Product for more details.
Step 3, Adding a Device
A Device is an entity from which Axonize receives events. A different procedure is required for each type of Device:
- Real Devices
- Virtual Devices
Real Devices
Real Devices are real-world entities that send events to the Axonize Server.
Real Devices can be added either using the Axonize Portal as described in Devices or using the Axonize REST API (as described in Step 3, Adding a Device ‒ Developer Workflow.
In addition, for each type of Real Device, you must define an Events Manifest, which defines the type of events sent from the Device to the Axonize Server. See Defining a Device Event Manifest for more information.
Virtual Devices
Virtual Devices generate and periodically send predefined random data events from inside the Axonize Server for application testing or demo purposes only.
Virtual Devices can be added using the Axonize Portal (as described below).
Ingesting Events from a Virtual Device
- For instructions about how to define a Virtual Device Manifest, see Defining a Virtual Device Manifest.
- To place this Virtual Device Manifest on the Axonize Server, click the Devices button in the left pane to display a list of Devices.
- Click the Add Device
 button.
 - Click the New Virtual Device
 button. The following displays:
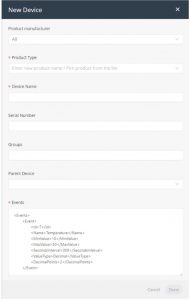
- Copy and then paste the manifest code into the Events field, shown above.
- Click Done.
Step 4, Defining Rules
Rules can be defined either using the Axonize Portal (as described below) or using Axonize REST API (as described in Step 6, Defining Rules – Developer Workflow.
Create the Rules that define the conditions and timing when specific actions are triggered. For example, a rule can define that an email is sent to specific person with a specific message when the temperature of a specific refrigerator goes over 20°.
- Devices – Specify the Applications, Products and Devices to which the Rule applies.
- Timing – Specify the timing in which the Rule takes effect.
- Conditions – Specify the conditions that trigger the Rule, such as when a Device reading is within a specific value range, over a specific threshold, geo-fence exit/entrance and so on. Rules can also be triggered according to a schedule that you define.
- Actions – Specify the operations that are activated when the Rule takes effect, such as sending an SMS/email, making a phone call, sending a call to a web service, sending information to an ERP/CRM or activating an endpoint on the Device, (such as opening a light or closing a lock). You can also specify that an AlarmInstance is created when the Rule is triggered. Various fields of information from the Rule itself and/or from the Event that triggered the Rule can be included in an SMS/email that is triggered by this Rule.
To define a Rule in the Axonize Portal:
- Use the Rules option
 in the Axonize Portal.
Step 5, Creating a Dashboard
Create a Dashboard and the widgets that it contains, in order to monitor and activate endpoints on your Devices. You can create multiple Dashboards. Axonize provides a variety of options for configuring the widgets that each contains. Each user can create multiple dashboards and then assign the users that are allowed to see them.
Step 6, Defining Users
Invite users to get started with Axonize. This involves specifying the Applications to which each user is allowed access and the permissions they have for accessing these Applications, such as read-only or editing privileges.
This step can be performed either using the Axonize Portal (as described below,) or using the Axonize REST API (as described in Step 8, Defining Users – Developer Workflow.
An Application can belong to multiple users.
Each Device belongs to a specific Application.
Each user is uniquely identified by their email address. A user with the same email can belong to multiple Applications and is considered a different user for each, meaning that this user has his/her own password, Client ID/Client Secret, mobile phone number and so on. The information shown in the Axonize Portal relates to this user/email address as two different users.
User Access Hierarchy
Users can only access the Applications to which they were assigned.
Users created under the Master Application can access all the Applications of that Tenant and all the Applications of that Tenant’s Sub-tenants.
Sub-tenant users can access all the Applications of that Sub‑tenant.
The auditing feature enables administrators and users to track system activity, including changes in Devices, Rules, Applications and Users.
Defining a User ‒ How To
- Use the
 option in the Axonize Portal. Each user created in the Axonize Portal must also be activated before it can be used.